
Many homeowners file a weather-related claim each year, and wind can cause far more than missing shingles. Wind damage restoration for residential properties starts with assessing the site safely, stopping active leaks, documenting every damaged surface, and clearing loose debris before repairs begin. The hidden issue is often structural, and it can change your insurance outcome and repair scope in ways you might not expect.
Key Takeaways
- Ensure the property is safe, check for hazards, and immediately contain leaks with tarps, buckets, and sealed openings.
- Document all wind damage with clear photos, videos, dates, and notes for insurance and contractor review.
- Remove debris carefully and inspect roofing, framing, siding, and attic areas for structural damage.
- Notify the insurer quickly, provide policy details and evidence, and track claim progress with a communication log.
- Prevent future damage by reinforcing vulnerable areas, sealing gaps, trimming trees, and scheduling post-storm inspections.
Assess Wind Damage Safely
Before you inspect any wind damage, make sure the area is safe to enter. In wind damage restoration for residential properties, you should check for downed lines, unstable trees, loose shingles, broken glass, and shifted framing before moving closer.
Wear sturdy boots, gloves, and eye protection, and keep children and pets away from hazards. Use daylight when possible, and photograph damage from a distance to document conditions without disturbing debris.
If you notice sagging walls, a leaning chimney, or roof movement, don’t enter the structure. You’ll protect your household and support a faster, better-coordinated repair process.
When you stay alert and follow a disciplined assessment routine, you help your team identify priority risks and plan the next restoration steps with confidence.
Stop Leaks and Water Intrusion Fast
Once you’ve confirmed the area is safe, move quickly to stop active leaks and limit water intrusion. You should place tarps, plastic sheeting, or roof patches over exposed openings and secure them tightly so wind can’t lift them.
Inside, catch dripping water with buckets and move furniture, electronics, and valuables away from wet zones. If water is entering through windows, doors, or vents, seal gaps with temporary coverings and weather-resistant tape.
Shut off power to affected circuits if moisture is near outlets or fixtures. Open unaffected windows only if it won’t worsen intrusion.
You’re protecting your home and helping your household stay stable while repairs begin. Fast containment reduces hidden moisture, limits secondary damage, and keeps your restoration team working from a controlled starting point.
Document Roof and Siding Damage
Document roof and siding damage as soon as it’s safe to do so, starting with clear photos and videos from multiple angles. You should capture close-ups of missing shingles, torn flashing, dented panels, lifted seams, cracked siding, and impact marks.
Then add wide shots that show the full roof plane and wall sections. Record the date, time, weather conditions, and exact locations of each issue. Keep your notes organized so you can share them with your insurer, contractor, and restoration team without confusion.
If you have access to previous inspection records, compare them to the current condition to show what changed. Detailed documentation helps you protect your claim and gives your repair crew the evidence they need to restore your home with confidence and care.
Remove Debris and Loose Materials
Clear away debris and loose materials as soon as the area is safe to access. You should wear gloves, eye protection, and sturdy footwear, then collect shingles, branches, siding fragments, and fasteners from walkways, yards, and entry points.
Use bins or tarps to group materials so you can sort them efficiently and keep your work area controlled. Check for sharp edges, nails, and unstable piles before you lift or move anything.
If wind has scattered insulation, glass, or small construction pieces, remove them carefully to reduce injury and secondary damage. Keep children and pets away, and mark hazardous zones until cleanup is complete.
Repair Wind Damage to Roof, Siding, and Gutters
After the site is safe, inspect the roof, siding, and gutters for missing, lifted, cracked, or loosened components. Then prioritize temporary protection before permanent repairs. You’ll work faster and safer when you document each defect, match materials, and keep your repairs consistent with the home’s original assembly.
Use tarps, sealant, and fasteners to stabilize exposed areas, but don’t overbuild temporary fixes that complicate final restoration.
- Replace damaged shingles, flashing, or panels with code-compliant materials.
- Refasten or reseal loose siding and trim to restore the envelope.
- Rehang gutters, reset hangers, and clear sagging sections for proper drainage.
When you repair these systems together, you help your home’s exterior function as one coordinated barrier, and you stay part of a prepared, resilient property team.
Dry Out Walls, Floors, and Attics
You’ll need to remove wall moisture quickly to prevent hidden saturation, material breakdown, and microbial growth.
Use targeted floor drying methods to extract trapped water and restore safe moisture levels in the subfloor and finish materials.
In the attic, you should control airflow carefully to accelerate drying without spreading damp air into other building cavities.
Wall Moisture Removal
When wind damage lets moisture into your walls, floors, or attic, prompt drying is essential to limit hidden deterioration and secondary mold growth. You’ll protect the assembly by opening cavities, isolating wet materials, and verifying moisture levels until readings return to normal.
A restoration team can help you feel confident with a controlled process:
- Inspect wall finishes, framing, and insulation for trapped moisture.
- Remove baseboards or access panels to improve airflow and measurement.
- Use dehumidification and directed air movement to stabilize indoor conditions.
You should document every reading, since elevated moisture can persist behind intact surfaces.
Floor Drying Methods
Once wall cavities are stabilized, you can shift drying efforts to the floors and attic, where wind-driven water often spreads through subfloors, insulation, and hidden framing.
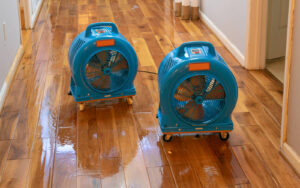
You should remove wet carpet, pad, and base trim fast, then expose the subfloor so you can measure moisture and target drying. Use air movers across floor surfaces, but keep them aimed to avoid forcing moisture deeper into seams.
For hardwood or engineered flooring, lift boards only when swelling or cupping persists.
In the attic, you need to pull saturated insulation and inspect joists, sheathing, and fasteners for trapped moisture.
Pair dehumidification with temperature control to speed evaporation. Monitor readings daily, and don’t stop until materials return to normal range, so your home’s structure stays sound.
Attic Airflow Control
In the attic, manage airflow carefully so drying doesn’t push moisture into new areas or over-dry specific materials. You should balance intake and exhaust fans to move humid air out while keeping insulation, framing, and sheathing within safe drying ranges.
Use meters to track wood moisture content and compare readings across bays, because you need consistent results, not guesswork.
- Open access points only as needed.
- Direct airflow across wet surfaces, not into cavities.
- Monitor temperature and relative humidity continuously.
You’ll protect your crew’s work when you limit dust movement and prevent condensation on cooler surfaces.
If you spot damp drywall or warped decking, adjust airflow and dehumidification together. That approach helps you restore the structure cleanly, efficiently, and with confidence.
Inspect for Hidden Structural Damage
After a windstorm, you should inspect the framing, trusses, roof decking, and load-bearing walls for hidden structural damage that may not be visible from the exterior.
Look for split members, shifted connections, nail pops, sagging planes, and gaps at joints where wind uplift may have stressed the structure.
In the attic, check sheathing for delamination, cracked rafters, and moisture staining that signals compromised roof integrity.
You should also examine wall intersections, ceiling lines, and door frames for new misalignment, since subtle movement can point to load transfer issues.
If you find deflection, rotation, or soft spots, treat the area as unstable and document it carefully.
A thorough inspection helps you protect your home and stay confident in your restoration team.
Handle Your Insurance Claim
Document the wind damage with clear photos, videos, repair estimates, and notes on affected roofing, siding, openings, and any water intrusion.
Notify your insurer as soon as possible and provide a concise, accurate claim summary with the supporting records.
Then track the claim’s status, respond promptly to adjuster requests, and keep a dated log of all communications and expenses.
Document Wind Damage
Thorough records can make the difference between a smooth claim and a delayed payout. You should photograph every affected area before cleanup, capturing roof shingles, siding, gutters, windows, and interior water marks.
Add close-ups and wide shots so the loss context stays clear. Keep your team organized with a simple log:
- Note the date, time, and weather conditions.
- List damaged materials, visible hazards, and estimated repair scope.
- Save receipts, contractor notes, and temporary protection costs.
Use consistent file names and back up images in cloud storage. Measure damaged sections when possible, and mark locations on a floor plan.
Precise documentation helps you present a credible claim and stay aligned with the restoration process.
Notify Your Insurer
With your photos, logs, and receipts organized, contact your insurer as soon as possible to open the claim and report the wind damage.
Provide the policy number, date of loss, property address, and a concise summary of affected areas, including roofing, siding, windows, and any interior intrusion.
Ask whether emergency mitigation is covered, and keep all temporary repair invoices.
Use exact terminology from your policy when describing the loss, and avoid guessing at hidden damage.
If the adjuster requests records, send them promptly and retain copies for your file.
Clear, factual communication helps you and your restoration team stay aligned, speeds coverage review, and supports a smooth path toward repairs.
Ask questions when coverage language feels unclear, and stay professional throughout.
Track Claim Progress
After you file the claim, keep a tight watch on its status and ask for the adjuster’s timeline, required inspections, and next documentation steps.
You’ll move faster when you stay organized and responsive. Log every call, email, and estimate so you can prove the sequence of events and keep your restoration team aligned.
- Confirm claim number, adjuster contact, and deadline dates.
- Submit photos, receipts, mitigation reports, and contractor estimates promptly.
- Follow up until you receive written approval, supplemental requests, or payment updates.
If the insurer delays, request a status review and document the reason.
You’re not steering this alone; a clear paper trail helps you stay connected to the process and supports a smoother wind damage recovery.
Prevent Future Wind Damage
To reduce the risk of future wind damage, you should reinforce vulnerable exterior components before the next storm season.
Inspect roof edges, soffits, fascia, gutters, and siding fasteners, then upgrade any loose or corroded materials.
Seal gaps around windows, doors, vents, and penetrations with code-approved flashing and high-performance caulk.
Trim trees away from the structure, secure loose patio items, and store lightweight outdoor equipment before severe weather.
If your home’s roof covering is aging, consider impact-rated shingles or improved attachment patterns.
You should also schedule professional inspections after major storms so your team can catch minor failures early.
When you maintain these systems consistently, you protect your property, reduce emergency repairs, and stay prepared alongside neighbors who value resilient homes.
Frequently Asked Questions
How Soon Should I Call a Wind Damage Restoration Company?
Call immediately after you’ve confirmed safety, because delays can worsen structural damage and water intrusion. You’ll protect your home better, document losses faster, and start repairs while issues are still manageable and covered.
Can I Stay in My Home During Wind Damage Restoration?
Yes, you can sometimes stay home during restoration if damage is limited and utilities work, but you’ll need to avoid unsafe rooms, noise, dust, and exposed areas. Your contractor should confirm when it’s safe.
What Items Should I Save Before Restoration Begins?
Save insurance papers, IDs, valuables, photos, electronics, medications, and irreplaceable keepsakes first. If you’re worried about time, picture your essentials in a labeled tote, ready before crews arrive, so you belong to the recovery process.
How Long Does Residential Wind Damage Restoration Usually Take?
You’ll usually see residential wind damage restoration take days to weeks, depending on damage severity, material availability, and moisture cleanup. You can expect quicker turnaround for minor repairs, but structural fixes and drying take longer.
Do I Need Permits for Major Wind Damage Repairs?
Yes, you’ll usually need permits for major repairs, especially structural, electrical, roofing, or plumbing work. You should check with your local building department first, because requirements vary and inspections often apply.
Recap
When wind damage leaves your home a bit bruised, your fastest path to recovery is a careful, methodical one. You assess hazards, stop moisture at the door, document every detail, and clear compromised materials before repairs begin. Then you dry, inspect, and restore hidden and visible systems alike. With a solid insurance claim and preventive upgrades, you can help your property weather the next storm with greater resilience and far fewer surprises.