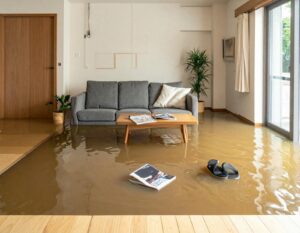
Nearly 40% of homeowners face water damage at some point, and sewage exposure raises the stakes fast. You need to decide if it’s safe to enter, stop the source, and secure the area before you pump out standing water. From there, contaminated materials, hidden moisture, and mold can turn a cleanup into a larger failure unless you handle each step in order.
Key Takeaways
- Put on protective gear, avoid unsafe areas, and document the damage before starting cleanup.
- Stop the water source, shut off power if needed, and remove standing water with pumps or wet vacs.
- Remove contaminated materials, bag debris securely, and clean surfaces before disinfecting them.
- Inspect for mold, hidden damage, and structural rot, then dry and repair affected areas properly.
- Prevent future backups with regular plumbing maintenance, clear drains, and sump pump and alarm checks.
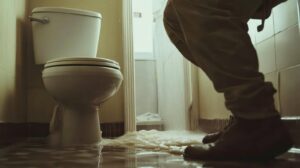
Is It Safe to Enter a Sewage-Flooded Home?
No—entering a sewage-flooded home isn’t safe until you’ve confirmed the area is stabilized and the immediate hazards are under control. You’re dealing with sewage health risks that can expose you to bacteria, viruses, and parasites through skin contact, splashes, and inhalation.
Before you step inside, you need proper safety precautions: wear waterproof boots, gloves, eye protection, and a respirator rated for contaminated environments.
If you have open cuts, respiratory issues, or a weakened immune system, stay out and let trained professionals handle it. You’re not being cautious alone; you’re protecting your household and your team.
After the area is assessed, you can move forward with confidence, knowing you’ve reduced exposure and kept the cleanup process controlled, safe, and manageable for everyone involved.
Stop the Water and Secure the Area
Once the area is safe to approach, shut off the main water supply immediately to stop additional flooding and limit structural damage.
Then identify the water source so you can confirm the leak has stopped. If the source isn’t obvious, check fixtures, appliances, and visible supply lines. Call emergency contacts, including your plumber, utility provider, and insurance representative, if you need fast guidance.
- Close the main valve fully.
- Shut off nearby fixture valves.
- Cut power only if water reaches outlets.
- Mark unsafe rooms and keep others out.
You’re protecting your home and your crew by controlling access early. Use tape, signs, or closed doors to secure the area.
Keep pets and children away, and document the scene with clear photos before moving on.
Pump Out Standing Water
Use a submersible pump or wet vac to remove standing water safely, and shut off power in the area before you start.
Work from the deepest point outward so you can clear water faster and reduce further spread.
Once the bulk water’s gone, set up air movers and dehumidifiers right away to speed drying.
Safe Water Extraction
Before you pump out standing water, kill power to the affected area and confirm the source is stopped so you don’t spread contamination or create an electrical hazard.
Use a submersible pump or wet vac rated for the water level, then discharge water to a safe drainage point that won’t backflow into the space. For flood prevention and water safety, work in stages and monitor the floor for hidden pooling.
- Wear gloves, boots, and eye protection.
- Check hoses, cords, and GFCI protection.
- Remove water from the highest point first.
- Stay with the pump until the area is clear.
You’re protecting your crew and your home when you move methodically, avoid agitation, and keep the work area controlled.
Fast Drying Steps
After you’ve removed the standing water, move straight into drying so moisture doesn’t linger in walls, floors, and trim.
You should open cabinets, pull back rugs, and lift wet furniture pads to expose hidden surfaces. Set up dehumidifiers for humidity control and run fans to improve air circulation across affected rooms.
Keep windows closed if outdoor air is damp; otherwise, you’ll slow the process. Check baseboards, underlayment, and wall cavities with a moisture meter, and keep working until readings drop to normal.
Replace saturated insulation and remove any materials that stay wet after 24 to 48 hours.
When you act quickly and stay organized, you protect the space, limit secondary damage, and help your team get the home back to safe, usable condition.
Remove Contaminated Materials and Debris
Identify any materials that look unsafe, such as soaked drywall, insulation, carpet, or insulation with visible contamination.
Bag debris in heavy-duty plastic, seal each bag, and keep contaminated items separated from salvageable materials.
Dispose of everything according to local waste and hazardous-material rules to avoid spreading contamination.
Identify Unsafe Materials
Once the area is safe to enter, separate and remove any materials that water has contaminated, including soaked drywall, insulation, carpet padding, ceiling tiles, and debris that can’t be fully cleaned and dried.
You should also identify hazards that need extra care, especially asbestos exposure and lead paint in older buildings. If you see cracking, flaking, or hidden layers in damaged materials, stop and assess before disturbing them.
Your crew belongs in a controlled, informed process that reduces risk and speeds recovery.
- Check for swelling, odor, and discoloration.
- Compare damaged areas with intact surfaces.
- Mark suspect materials for special handling.
- Keep salvageable items separate from unsafe ones.
Bag And Seal Debris
Bag contaminated debris in heavy-duty contractor bags as you remove it, then seal each bag tightly to keep dust, mold spores, and other contaminants contained.
You’ll work faster when you sort debris types as you go: soaked drywall, carpet, insulation, baseboards, and warped trim. Keep cleanable items separate from porous waste so you don’t cross-contaminate the space.
Use double-bagging for sharp or crumbly materials, and choose sealing methods like twist ties, duct tape, or zip closures that hold under lifting and transport.
Don’t overfill bags; leave room to tie them securely. Move each sealed bag out of the work area right away to maintain a safer, more organized cleanup zone for everyone on your crew.
Dispose Per Local Rules
After you’ve removed and sealed contaminated debris, dispose of it according to local regulations and site requirements. You protect your crew and your property when you follow local disposal rules exactly.
Check whether materials qualify as hazardous waste, and separate them from regular trash. Use approved transport containers, label each bag, and keep manifests if your area requires them. You’ll reduce exposure, avoid fines, and support a safer recovery for everyone on site.
- Confirm pickup options with your municipality.
- Keep wet drywall, insulation, and carpet isolated.
- Wear PPE during loading and transfer.
- Document every load for traceability.
When you work this way, you stay aligned with the team, meet compliance standards, and move cleanup forward without delays.
Clean and Disinfect Contaminated Surfaces
Start with a thorough cleaning of every contaminated surface, then disinfect it with an appropriate product to reduce the risk of mold, bacteria, and other pollutants.
You’ll want to sanitize surfaces with detergent and water first, because dirt can block effective disinfectants. Work from the cleanest area to the dirtiest, and use disposable cloths or mops so you don’t spread contamination.
Follow the label on each disinfectant for dwell time, dilution, and safe use. Wear gloves and eye protection, and keep the area ventilated.
If you’re restoring a shared space, treat high-touch points like handles, switches, and counters with extra care so everyone can feel confident returning.
Replace any cleaning tools that can’t be fully disinfected, and wash reusable items separately after each use to maintain control.
Dry Walls, Floors, and Hidden Moisture
Use fans, dehumidifiers, and open pathways to dry walls, floors, and any trapped moisture as quickly as possible. You’ll protect your home and your team by moving air across wet surfaces and reducing humidity fast.
Check baseboards, trim, and flooring edges for swelling.
Use moisture detection tools to find damp pockets behind walls.
Lift carpet and padding if water soaked through.
If drywall stays soft or stained, plan drywall replacement.
Keep doors open between rooms so airflow reaches hidden spaces. Remove wet insulation, damaged underlayment, and soaked materials that won’t dry well.
Monitor readings daily until surfaces return to normal. If you stay organized and act early, you’ll reduce structural damage and keep your cleanup on track.
Check for Mold After Sewage Cleanup
Once the sewage has been removed and surfaces have dried, inspect walls, floors, insulation, and hidden cavities for mold growth.
Use a flashlight, look for discoloration, musty odors, and fuzzy or slimy patches, and check around baseboards, under flooring, and behind wall trim. Different mold types can appear green, black, white, or gray, so don’t rely on color alone.
If you spot growth, treat the area as contaminated and keep your team safe by avoiding dust disruption. Mold spores can spread fast and create health risks, especially for people with asthma, allergies, or weak immune systems.
Document what you find, note affected rooms, and monitor damp zones daily. When you stay alert together, you protect your home and everyone in it.
Repair the Damage and Restore Your Home
After you’ve confirmed the area is free of mold or treated contaminated spots, move into repairs and full restoration. Start with a damage assessment, documenting warped drywall, soaked insulation, and weakened trim.
Then, remove compromised materials and dry framing before you rebuild. Use restoration techniques that match the material: patch small drywall sections, replace insulation, refinish flooring, and seal surfaces once they’re stable.
- Inspect structural members for hidden rot.
- Replace damaged drywall and baseboards.
- Reinstall insulation and repair finishes.
- Test fixtures, outlets, and plumbing connections.
Work methodically so you’re not missing issues that can spread. If you stay organized, you’ll restore a safe, familiar space that feels like home again.
Prevent Future Sewage Backups
To reduce the risk of another sewage backup, you should inspect and maintain the system that protects your home’s wastewater flow.
Schedule regular plumbing inspections to spot root intrusion, pipe bellies, corrosion, and partial blockages before they become failures. Keep drains clear by avoiding grease, wipes, and other nonflushables, and use strainers in sinks and showers.
If your property has a sewer cleanout, make sure it stays accessible and sealed. Ask a licensed plumber about backwater valves, especially if backups hit your neighborhood.
Good preventive maintenance also includes checking sump pumps, testing alarms, and cleaning floor drains.
When you stay ahead of buildup and wear, you protect your home and help your household feel secure together.
Frequently Asked Questions
What Insurance Claims Cover Water Damage Cleanup Costs?
Your insurance policies may cover water damage cleanup if a sudden burst pipe, appliance leak, or storm causes it; flood damage usually needs separate coverage. You should review exclusions, deductibles, and claim documentation carefully.
How Long Does Sewage Restoration Usually Take?
Sewage restoration usually takes 3–7 days, depending on contamination and drying. Your Sewage cleanup timeline speeds up with rapid extraction, antimicrobial treatment, and repairs. The Restoration process duration can extend if structural damage or mold appears.
Should I Hire a Professional Restoration Company?
Yes, you should hire a professional restoration company when water damage is extensive or contaminated. They’ll use proven restoration techniques, protect your home, and help you feel confident that you’re not handling it alone.
Can Furniture Be Saved After Sewage Exposure?
Yes, you can sometimes save furniture after sewage exposure, but you need a furniture assessment first. Professionals use restoration techniques to judge material, contamination, and structural damage, then clean, disinfect, dry, and decide if replacement’s safer.
How Do I Document Damage for an Insurance Claim?
Photograph promptly, record dates, list damaged items, and keep receipts. You’ll create a clear damage assessment that strengthens your claim process. Share copies with your insurer, and stay connected with your adjuster throughout.
Summary
You’ve seen the contrast: fast action prevents lasting damage, while delay turns cleanup into reconstruction. Stop the source, remove contaminated water and materials, then dry, disinfect, and inspect for mold before you rebuild. Treat every damp cavity as a risk, not a nuisance. When you restore damaged areas and keep drains, pumps, and backflow devices maintained, you reduce the chance of another sewage backup and protect your home’s structure, air quality, and safety.