
You don’t need to wait until the damage gets worse to start your claim. Storm damage restoration should begin by documenting every affected area, making only urgent repairs, and keeping receipts and photos organized before the adjuster arrives. You’ll also want to compare repair estimates carefully and stay on top of delays, because small mistakes can slow payment and leave your property exposed. The next step is where many claims either move forward or stall.
Key Takeaways
- File the storm damage claim immediately, keep policy details and claim numbers organized, and document every conversation.
- Photograph and video all damage before repairs, including structural issues, water stains, broken materials, and affected belongings.
- Make temporary emergency repairs to prevent further loss, save receipts, and note any professional help needed for unsafe conditions.
- Compare contractor estimates carefully against documented damage, checking labor, materials, timelines, warranties, and included services.
- Follow up regularly with the insurer, respond quickly to requests, and escalate delays if the claim stalls.
How to File a Storm Damage Claim
When storm damage hits, you need to file your claim quickly and document everything before repairs begin. You should contact your insurer right away, give a clear account of the event, and ask for your claim number.
Stay organized with dates, policy details, and every conversation you have. If your home feels unsafe, make only temporary emergency fixes to prevent more loss, then tell the insurer what you did.
During storm damage restoration and insurance claims, you’ll move faster when you respond promptly to adjuster requests and keep your contractor in the loop.
Ask for written estimates and review your coverage carefully so you know what’s included. You deserve a team approach, and you can guide the process with confidence, clarity, and steady follow-through.
Document Storm Damage Before Repairs
Before any repair crew starts work, you need a clear record of the storm damage. Photograph every affected area from wide and close angles, including roofs, siding, windows, ceilings, floors, and belongings.
Capture water stains, shattered materials, missing shingles, and visible structural shifts. If it’s safe, add date-stamped video and note when you found each issue.
Keep receipts, contractor notes, and any communication tied to the loss. Create a simple inventory of damaged items with estimated values and room locations.
Store everything in one digital folder so you can share it fast with your insurer and stay organized. Clear, thorough documentation helps you support your claim with confidence and keeps you connected to a smoother recovery path.
Make Emergency Repairs Right Away
You need to secure the damaged area right away to stop water intrusion, wind exposure, and other hazards from getting worse.
Cover broken openings, remove loose debris, and make temporary fixes that protect your home from further loss.
These emergency repairs help you limit additional damage and support your storm restoration claim.
Secure The Damage
After a storm, securing the damage right away helps prevent further loss and protects your insurance claim. You should cover broken openings with tarps, board up shattered windows, and stabilize loose materials so your home stays safe and ready for inspection.
Use sturdy, temporary fixes that clearly show you acted fast and responsibly. Keep receipts for any supplies you buy, and note the date and time of each repair.
If conditions are unsafe, call a licensed professional who can secure the area without making the problem worse.
You’re not just protecting your property; you’re showing your insurer that you took reasonable action. That gives you confidence, strengthens your claim, and helps you stay connected to a community that looks out for one another.
Prevent Further Loss
Once the area is secured, make emergency repairs right away to stop the damage from spreading. You protect your home, strengthen your insurance claim, and show your carrier you acted responsibly.
Cover broken windows, tarp roof openings, and board exposed entries before more rain, wind, or debris gets inside. Keep every receipt, photo, and contractor note so you can prove what you did and why.
- Use temporary materials that prevent leaks and collapse
- Document each repair before and after you finish
- Call a trusted restoration pro if damage looks unsafe
Act fast, but don’t rush past quality. You belong in a process that’s organized, clear, and on your side.
Smart emergency repairs limit loss now and help you move confidently into the claims step.
Prepare for the Adjuster Visit
Before the adjuster arrives, gather every piece of documentation that supports your claim, including dated photos, repair receipts, emergency service invoices, and a clear list of damaged areas.
You’ll want to organize these items in one folder or digital file so you can present them quickly and confidently.
Walk the property beforehand and note anything the storm touched, from roof shingles to soaked drywall.
Be ready to point out temporary fixes you made to protect your home.
During the visit, stay present, answer questions directly, and don’t downplay damage to keep the process moving.
You belong in this conversation, and your careful preparation helps the adjuster see the full scope of your loss.
Clear, factual communication can strengthen your claim and support a fair outcome for your restoration.
Compare Contractor Estimates for Repairs
You should compare contractor estimates line by line so you can see exactly what each repair plan includes.
Check the scope of work, materials, labor, and timeline to spot pricing differences and missing items.
Choose the estimate that matches the documented storm damage and gives you clear, complete repairs.
Comparing Repair Estimates
When the adjuster’s report is in hand, compare contractor estimates line by line so you can spot gaps in scope, materials, labor, and code-related repairs.
You deserve a clear apples-to-apples view, not guesswork, so ask each contractor to explain pricing, timelines, and exclusions. If one bid is lower, check whether it leaves out permits, disposal, matching, or protection for intact areas.
Bring every estimate back to the same baseline, and keep your questions direct and organized.
- Confirm unit prices for roofing, siding, drywall, and paint.
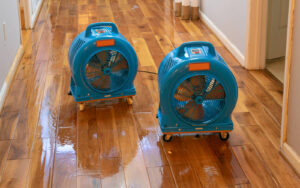
- Check whether emergency dry-out or debris removal is included.
- Verify warranty terms and payment schedules before you choose.
This process helps you protect your claim, stay confident, and join a team that’s focused on getting your home restored right.
Scope Of Work
A contractor’s scope of work should spell out exactly what gets repaired, replaced, or protected, so you can compare bids without guessing. You should look for clear line items on roofing, siding, drywall, insulation, flooring, and cleanup, plus any temporary protection that keeps further damage from spreading.
If one estimate leaves out tear-off, disposal, or matching materials, you need to ask why. Strong scopes also identify permits, code-required upgrades, and moisture testing when needed.
When you review each proposal side by side, you can see who understands the full storm impact and who’s just giving you a partial fix. That clarity helps you stay in control, work with confidence, and choose a team that treats your property like it belongs in good hands.
Pricing Differences
Pricing differences often reveal more than the bottom line, so compare each contractor estimate line by line instead of chasing the cheapest total.
You need to see what’s included, what’s missing, and where one bid protects your home better than another. A lower price can hide weaker materials, shorter labor coverage, or skipped cleanup that leaves you exposed later.
Ask each contractor to explain allowances, code upgrades, and disposal costs so you can judge value with confidence.
- Confirm matching repair scopes.
- Check labor rates and material grades.
- Review warranty terms and exclusions.
When you compare estimates this way, you join a smarter group of homeowners who make informed decisions, support quality work, and avoid surprise charges during restoration.
What to Do If Your Claim Is Delayed
If your storm damage claim stalls, don’t wait passively—follow up with your insurer, ask for a specific reason for the delay, and request a clear timeline for the next step.
Keep every call, email, and document in one place so you can track promises and deadlines. If the adjuster needs more evidence, send photos, contractor estimates, repair receipts, and any emergency mitigation records right away.
Stay firm but respectful, and ask what else they need to move your file forward. If the delay continues, request a supervisor review or file a formal complaint with your state insurance department.
You deserve timely support and a team that treats your home like it matters. Stay organized, stay visible, and keep pushing until you get a decision.
Frequently Asked Questions
Does Homeowners Insurance Cover Storm-Related Mold Damage?
Usually, yes if a covered storm caused it and you act quickly. You’ll need prompt documentation, emergency drying, and proof of sudden damage. Your insurer may deny mold from neglect or long-term leaks.
How Soon Must I Report Storm Damage to My Insurer?
You should report storm damage as soon as you can—ideally within 24 hours. Like a flash flood, speed matters; you’ll protect your claim, strengthen your case, and stay connected to the support you deserve.
Will Filing a Storm Claim Raise My Insurance Premiums?
Yes, it can, but not always; your insurer may review claim history, location, and storm severity. You should ask about surcharge rules, deductible impact, and mitigation credits so you can protect your costs.
Can I Choose My Own Storm Restoration Contractor?
Yes, you can usually choose your own storm restoration contractor, and you should pick one you trust. You’ll want licensed, insured pros who document damage, coordinate with your adjuster, and protect your claim.
What if My Roof Was Already Old Before the Storm?
An old roof may still qualify; insurers often cover storm-caused damage, not wear. You’ll need photos, dates, and an adjuster visit. Some claims include depreciation disputes, so document everything carefully.
Review
When storm clouds pass, you’re left to pick up the pieces, but you don’t have to do it alone. You’ve documented the damage, made quick repairs, and lined up estimates, so you’re ready to press your claim with confidence. Stay organized, stay persistent, and keep every conversation on record. Like a captain steering through rough waters, you can guide the process to a fair resolution and get your home restored sooner.