When a storm hits, the aftermath can feel overwhelming, but knowing reliable techniques for storm damage recovery can make a significant difference. Start by evaluating the damage thoroughly to understand the extent of your situation. You’ll need to prioritize safety before diving into repairs, ensuring you’re protected from hidden hazards. It’s essential to document everything for insurance purposes, but there’s more to reflect upon as you navigate this challenging process. What steps will you take next?
Key Takeaways
- Inspect and document all visible damage with photos and notes to support insurance claims effectively.
- Prioritize safety by assessing hazards and wearing protective gear before starting repairs.
- Use pumps and dehumidifiers for water removal and drying, preventing mold growth.
- Implement proactive maintenance techniques, like sealing cracks and checking roofs, to prevent future damage.
- Collaborate with professionals and neighbors for support, sharing tips and resources for efficient recovery.
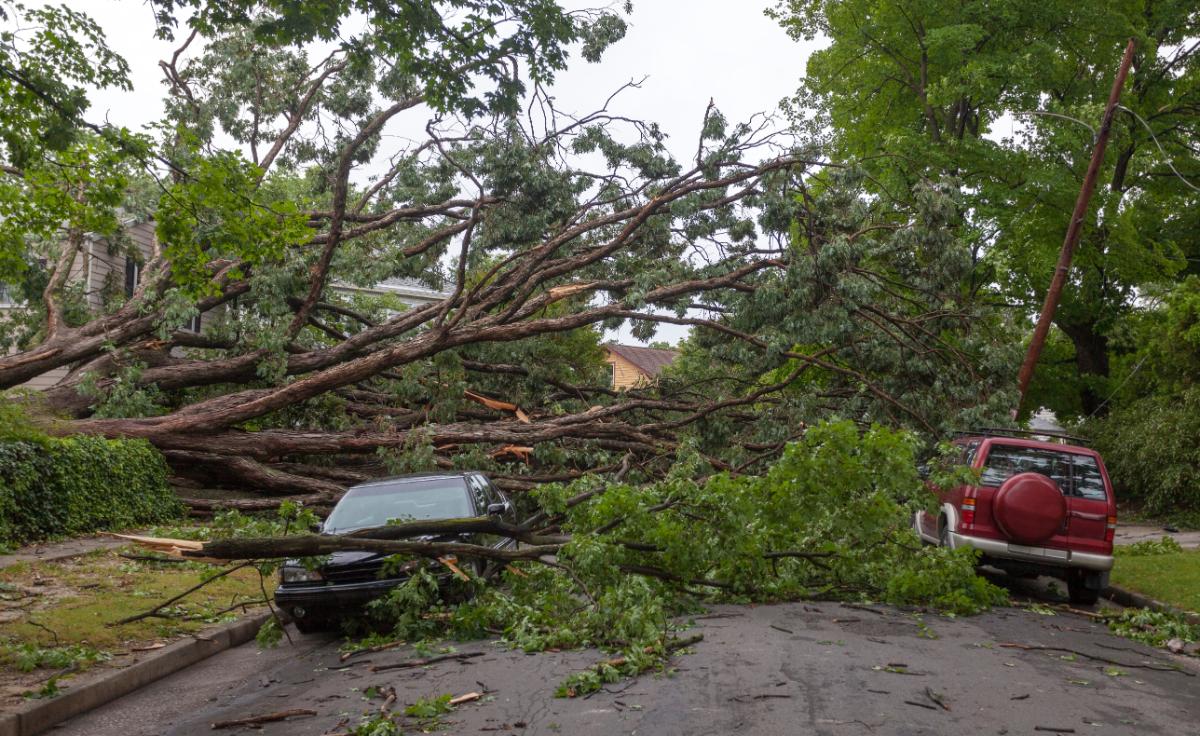
Assessing the Damage After a Storm
After a storm, evaluating the damage is essential to understanding the extent of the impact on your property. Start by carefully inspecting your home and surrounding areas for visible signs of destruction. Look for roof leaks, broken windows, and damaged siding, as these issues can escalate if left unchecked.
Document your findings with photos and detailed notes; this damage evaluation will be invaluable for insurance claims and repair evaluations.
Don’t forget to check your landscaping—fallen branches and uprooted trees can pose risks. While you may feel overwhelmed, remember that addressing the storm aftermath step by step can help you regain control.
Reach out to neighbors for support; sharing experiences can foster a sense of community during challenging times. By methodically evaluating the damage, you’ll be better prepared to move forward and restore your space, creating an environment where you and your loved ones can feel safe again.
Safety Precautions Before Starting Repairs
Before you begin any repairs, it’s essential to assess the hazards present in your environment.
Look for downed power lines, unstable structures, and sharp debris that could pose risks.
Equipping yourself with protective gear, like gloves and sturdy boots, safeguards you and ensures you’re prepared for the tasks ahead.
Assess Hazards First
As you prepare to tackle storm damage repairs, it’s essential to assess potential hazards first to ensure your safety and that of others. Begin with hazard identification to pinpoint risks in your environment. Conducting a thorough risk assessment allows you to prioritize repairs and address the most dangerous areas first. Here’s a simple table to help you categorize hazards:
| Hazard Type | Description | Immediate Action |
|---|---|---|
| Structural Damage | Compromised roofs or walls | Avoid entering affected areas |
| Electrical Hazards | Exposed wires or flooded outlets | Turn off power supply |
| Debris Risks | Fallen trees or large debris | Maintain a safe distance |
Wear Protective Gear
Wearing protective gear is essential when you’re about to start storm damage repairs, as it greatly reduces the risk of injury. By investing in high-quality protective clothing and safety equipment, you’re safeguarding yourself and showing care for those who may depend on you.
Think about sturdy gloves to shield your hands from sharp objects and reinforced boots to protect your feet from heavy debris. Safety goggles can prevent eye injuries from flying particles, while hard hats offer critical head protection. Each piece of gear plays an important role in ensuring your safety.
Documenting Damage for Insurance Claims
Documenting damage after a storm is essential for securing the insurance claims you need to recover. Start with a thorough damage assessment—take notes on all affected areas, including structural damage, broken windows, and damaged landscaping. Use your smartphone or camera to capture clear photos from multiple angles. Confirm you include dates and times in your documentation; this helps establish a timeline for your insurance provider.
When compiling your insurance documentation, organize your materials neatly. Create a folder for photos, notes, and any repair estimates. This detailed presentation strengthens your claim and shows you’re serious about recovery.
Remember, insurers want clarity, so the more precise you are, the better.
Lastly, empathize with your situation—you’re not alone in this process, and many are steering through similar challenges. Sharing experiences can foster a sense of community as you all work towards rebuilding and recovery.
Removing Water and Moisture Effectively
Effective water removal is essential for preventing further damage and ensuring a swift recovery after a storm. You’ll want to start with effective water extraction methods, such as pumps and wet vacuums, to remove standing water quickly.
Make sure to assess the extent of the water damage, as acting fast can greatly reduce restoration costs.
Once you’ve cleared the bulk of the water, turn your focus to moisture control techniques. Utilize dehumidifiers and fans to dry out affected areas and materials.
This step is vital; lingering moisture can lead to mold growth, which complicates recovery efforts. Keep windows open if the weather permits, allowing for increased airflow.
Cleaning and Disinfecting Affected Areas
After addressing the immediate water issues, the next step is to clean and disinfect the affected areas thoroughly. Following proper sanitation protocols is essential to prevent mold growth and ensure safety. Here are some effective disinfectant options to take into account:
| Disinfectant Type | Effectiveness |
|---|---|
| Bleach Solution | Kills bacteria and viruses |
| Hydrogen Peroxide | Effective against mold spores |
| Vinegar | Natural option for light cleaning |
| Commercial Disinfectants | Fast-acting and reliable |
Before applying any disinfectant, make sure to wear protective gear. Start by removing debris, then apply the chosen disinfectant as directed. Allow sufficient contact time for effectiveness. Remember, your safety and health are paramount, and thorough cleaning fosters a sense of community and belonging as you recover together. By following these steps, you’ll create a healthier environment for you and your neighbors.
Repairing Water-Damaged Ceilings
When you’re facing a water-damaged ceiling, the first step is evaluating the extent of the damage.
It’s essential to identify any structural issues before moving on to repairing unsightly water stains.
Addressing both aspects promptly restores your ceiling’s appearance and safeguards your home from further complications.
Assessing Ceiling Damage
How can you accurately assess ceiling damage after a storm? Start with a thorough ceiling inspection to identify any visible signs of damage. Look for discoloration, sagging, or moisture spots, and take notes for your damage assessment. Here’s a helpful breakdown:
| Damage Type | Indicators |
|---|---|
| Minor Damage | Small stains, no sagging |
| Moderate Damage | Larger stains, slight sagging |
| Severe Damage | Major sagging, mold growth |
Repairing Water Stains
Repairing water stains on your ceiling can be a straightforward process if you approach it methodically. Start by identifying the source of the leak to prevent further damage.
Once you’ve fixed the issue, you can begin the water stain removal. Using a mixture of water and bleach, gently scrub the stain with a sponge. For larger stains, consider applying a stain-blocking primer before repainting.
Explore various ceiling repair techniques, like patching or replacing damaged drywall, if necessary. After ensuring everything’s dry, paint over the repaired area to match the rest of your ceiling.
Addressing Mold Growth Promptly
Although mold growth is a common consequence of storm damage, addressing it promptly can greatly reduce health risks and property damage.
When you notice the first signs of mold, it’s vital to act quickly. Mold thrives in damp environments, so start by removing any standing water and drying affected areas thoroughly. This is an essential step in mold prevention.
Consider professional mold remediation if the infestation is extensive. Experts can assess the situation, ensuring that hidden mold isn’t overlooked.
They’ll eliminate the current problem and provide guidance on long-term solutions to prevent future growth.
Preventing Future Water Damage
While storms can wreak havoc on your property, taking proactive measures can greatly reduce the risk of future water damage. Implementing effective waterproofing techniques is essential.
Start by sealing cracks in your foundation and installing drainage systems to divert water away from your home. Regularly inspect your roof for leaks and ensure that gutters are clear to facilitate proper water flow.
Seasonal maintenance plays a critical role, too. Before heavy rains, check your property for any potential vulnerabilities, such as loose shingles or clogged downspouts. Don’t forget to test your sump pump to verify it’s functioning correctly.
Creating a checklist for seasonal tasks can foster a sense of community, as you can share tips with neighbors and support each other in keeping homes safe.
Working With Professional Restoration Services
When facing the aftermath of a storm, enlisting professional restoration services can be essential for a swift and effective recovery.
These experts help restore your home and guide you through the complexities of the restoration timeline and service costs.
Consider these key points when working with professionals:
- Experience and Expertise: Confirm they’ve a proven track record in storm recovery.
- Transparent Estimates: Look for clear breakdowns of service costs to avoid surprises later.
- Communication: Choose a service that prioritizes keeping you informed throughout the process.
Tips for Homeowners During Recovery
After engaging with professional restoration services, homeowners often find themselves steering through the recovery process with a mix of hope and uncertainty.
To navigate this challenging time, prioritize emergency preparedness; create a detailed recovery plan that outlines necessary repairs and timelines. This proactive approach gives you a clearer path forward and alleviates anxiety.
Don’t underestimate the power of community support. Reach out to neighbors and local organizations for assistance and resources. Sharing your experience can foster connections and provide emotional relief, reminding you that you’re not alone in this journey.
Document all damages thoroughly for insurance claims, and keep receipts for any incurred expenses. Staying organized will streamline your recovery efforts.
Finally, take time for self-care; emotional resilience is essential during recovery. Embrace the support around you, and remember that rebuilding isn’t just about structures—it’s about coming together as a community.
Summary
In the aftermath of a storm, recovery can feel like steering through a maze. By evaluating damage, prioritizing safety, and effectively removing water, you’re building a solid foundation for restoration. Documenting your findings helps pave the way for successful insurance claims, while addressing mold and preventing future issues ensures your home remains a safe haven. Remember, engaging with professionals and your community can turn a formidable journey into a collaborative effort, making recovery possible and empowering.