When water makes its unwelcome entrance into your home, it can lead to a delicate situation that requires immediate attention. Swift mold removal is essential to safeguard your health and property. You need to act quickly, but knowing where to start can be overwhelming. By evaluating the affected areas and ensuring safety precautions, you can effectively tackle the issue. But how do you navigate the complexities of mold remediation?
Key Takeaways
- Identify and document visible mold growth and moisture, focusing on areas with high humidity and potential water damage.
- Ensure safety by wearing protective gear and sealing off affected areas to prevent mold spread during removal.
- Use a submersible pump for water extraction, and dehumidifiers to maintain indoor humidity below 60%.
- Dry all surfaces thoroughly with fans and open windows for ventilation, monitoring humidity levels regularly.
- Utilize mold-resistant materials in repairs and conduct routine inspections to prevent future mold growth.
Assessing the Affected Areas
When you assess the affected areas after flooding, it’s crucial to approach the situation systematically.
Start by identifying visible signs of water damage and mold. Pay attention to common mold types, such as black mold and white mold, which can thrive in damp environments. Use effective inspection techniques, including visual inspections and moisture meters, to determine the extent of the damage.
Check behind walls, under carpets, and in hidden corners where moisture may linger. Document your findings, noting areas with high humidity and standing water, as these are prime locations for mold growth.
Don’t forget to take into account airflow and ventilation, as poor air circulation can exacerbate mold issues. By being thorough in your assessment, you’ll create a solid foundation for the next steps in mold removal, fostering a safe environment for you and your loved ones.
Ensuring Safety Precautions
Before you begin the mold removal process, it’s vital to prioritize safety precautions to protect yourself and others. Proper safety equipment is essential, including gloves, masks, and goggles. Familiarizing yourself with emergency procedures can also enhance your readiness in case of unexpected situations.
| Safety Equipment | Purpose |
|---|---|
| Gloves | Protects your skin |
| Masks | Prevents inhalation |
| Goggles | Shield your eyes |
| Protective Clothing | Minimizes exposure |
Ensure you have a first aid kit handy and know how to shut off utilities if needed. Always work in well-ventilated areas to avoid exposure to mold spores. By following these safety precautions, you safeguard your health and create a safer environment for everyone involved in the cleanup. Taking these steps seriously makes a difference in the overall safety of the mold removal process.
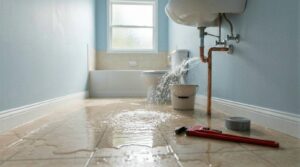
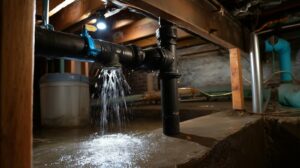
Removing Water and Moisture
After ensuring safety precautions are in place, the next step involves removing water and moisture to prevent mold growth.
Effective water extraction and moisture control are vital in this phase. Here’s how you can tackle it:
Use a pump: If the area is flooded, a submersible pump can quickly remove standing water.
Employ dehumidifiers: Once the majority of water is extracted, place dehumidifiers in affected areas to absorb residual moisture. This helps maintain indoor humidity levels below 60%.
Ventilate the space: Open windows and doors to promote airflow. Fans can also assist in drying out surfaces and preventing moisture buildup.
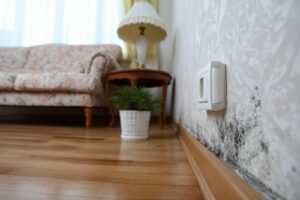
Identifying Mold Growth
To effectively address mold growth, you need to recognize the signs indicating its presence, such as visible discoloration or a musty odor.
Focus on common growth areas like basements, bathrooms, and behind walls, where moisture often accumulates.
Be aware of the health risks associated with mold exposure, which can range from respiratory issues to allergic reactions.
Signs of Mold Presence
Mold can thrive in damp environments, making it vital to identify signs of its presence promptly. If you suspect mold growth, here are the key indicators to look for:
Visible Mold: Look for black, green, or white spots on walls, ceilings, or other surfaces.
Musty Odor: A persistent, earthy smell often signals mold lurking nearby, even if it’s not visible.
Health Symptoms: Frequent sneezing, coughing, or irritation can be signs of mold exposure.
Using effective mold inspection techniques is essential for identifying moisture sources that contribute to mold growth.
Regularly checking these signs will help you maintain a safe, healthy environment, ensuring you and your loved ones can enjoy your home without worry.
Common Growth Areas
Identifying where mold is likely to grow can help you take proactive measures to prevent its spread. Common growth areas include flooded basements and damp walls, where moisture creates an ideal environment for mold spores to thrive.
Inspect corners, behind appliances, and under sinks, as these spots often retain water and humidity. Pay attention to areas with poor ventilation, like bathrooms and laundry rooms, where condensation can accumulate.
If you notice discolored patches or a musty odor, it’s essential to act quickly. Removing any wet materials and drying out these areas can greatly reduce the risk of mold growth.
Staying vigilant about these common areas ensures a healthier living space for you and your loved ones.
Health Risks Associated
While you may not always see mold, its presence can pose significant health risks. Mold can trigger a variety of health issues, especially in sensitive individuals.
Here are three key risks you should be aware of:
Mold Allergies: Exposure can lead to sneezing, a runny nose, and itchy eyes, making everyday life uncomfortable.
Respiratory Issues: Inhalation of mold spores can exacerbate asthma or cause coughing and wheezing, particularly in vulnerable populations.
Infections: Certain types of mold can lead to more severe infections, particularly in those with weakened immune systems.
Being proactive about identifying and addressing mold growth is essential for your health and well-being.
Don’t underestimate the importance of a safe, mold-free environment.
Containing the Mold Spread
To effectively contain mold spread, you need to seal off affected areas immediately.
Use plastic sheeting to cover doors and vents, preventing spores from migrating to other parts of your home.
Additionally, wearing protective gear, such as masks and gloves, is essential to safeguard your health while addressing the issue.
Seal Affected Areas
Once you’ve identified the areas affected by mold, sealing them is crucial to contain its spread and prevent further contamination.
You’ll want to choose the right sealant types and sealing methods to effectively lock in the mold spores. Here are three key steps to follow:
Select a Sealant: Use a high-quality mold-resistant sealant, such as epoxy or polyurethane, that fits the surface material.
Prepare the Surface: Clean and dry the affected area thoroughly before applying the sealant to ensure proper adhesion.
Apply the Sealant: Use a brush or roller for even application, ensuring all seams and edges are securely sealed.
Use Protective Gear
When dealing with mold removal after flooding, using protective gear is essential for your safety and to contain the mold spread effectively. Proper protective clothing and safety equipment can help minimize your exposure to harmful spores. Here’s a quick guide to the essential gear you should consider:
| Type of Gear | Purpose |
|---|---|
| N95 Respirator | Filters out mold spores |
| Gloves (rubber/latex) | Protects your hands from contact |
| Safety Goggles | Shield your eyes from irritants |
| Full-Body Suit | Covers skin and minimizes exposure |
Cleaning and Disinfecting Surfaces
Cleaning and disinfecting surfaces after flooding is essential to prevent mold growth and safeguard your health.
Once you’ve removed standing water, focus on the surfaces affected by the flood. Using the right cleaning agents and disinfecting techniques will help eliminate any residual contaminants.
Here are three steps to effectively clean and disinfect your space:
Choose the Right Cleaning Agent: Use a mixture of water and a suitable detergent to clean surfaces. For tougher areas, consider a bleach solution (one cup of bleach per gallon of water) for disinfection.
Scrub Thoroughly: Apply the cleaning agent with a sponge or cloth, scrubbing all surfaces, including walls, floors, and furniture.
Rinse and Dry: Rinse the surfaces with clean water to remove any cleaning agents, then dry completely to minimize moisture.
Drying and Dehumidifying the Space
To effectively prevent mold growth after flooding, drying and dehumidifying the space is essential. Start by employing effective drying techniques. Use fans to circulate air and open windows for cross-ventilation.
For larger areas, consider industrial-grade dehumidifier options that can extract moisture more efficiently than standard models. Set these units to operate continuously until humidity levels drop below 60%.
In addition to using dehumidifiers, you can also deploy desiccants like silica gel or calcium chloride in confined spaces to absorb excess moisture.
Monitor humidity levels regularly with a hygrometer to ensure you’re maintaining the right balance.
Preventing Future Mold Growth
Although the immediate aftermath of flooding is crucial for preventing mold, ongoing measures are essential to ensure that mold doesn’t return.
To create a mold-resistant environment, you should consider the following:
Use mold-resistant materials: Opt for mold-resistant paint, drywall, and insulation during repairs. These materials help minimize mold growth in the future.
Conduct regular inspections: Make it a habit to check your home for signs of moisture or mold. Look in hidden areas like under sinks, behind appliances, and in basements. Early detection can prevent bigger issues.
Maintain ideal humidity levels: Keep indoor humidity below 60% using dehumidifiers and proper ventilation. This helps create an environment where mold struggles to thrive.
Final Thoughts
Swift mold removal after flooding isn’t just important—it’s essential for your home’s survival. By carefully evaluating affected areas, ensuring safety, and effectively removing moisture, you’re taking critical steps to protect your health and property. Containing and cleaning mold growth with thorough drying techniques will help stave off future infestations. Remember, neglecting these actions can lead to a mold nightmare that spreads like wildfire, threatening both your home and well-being. Stay proactive and safeguard your environment.