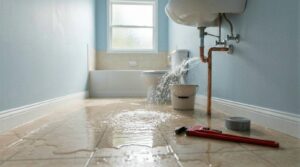
Addressing mold remediation after flooding issues promptly is essential to prevent health risks and property damage. By understanding effective mold remediation techniques, you can tackle the problem head-on and create a healthier environment. Let’s explore strategies that mitigate mold and ensure long-term prevention and safety in your home.
Key Takeaways
- Utilize moisture meters to assess dampness levels and identify areas prone to mold after flooding.
- Ensure proper ventilation by opening windows and using exhaust fans to reduce humidity effectively.
- Clean affected areas with safe agents like hydrogen peroxide or white vinegar to eliminate mold spores.
- Remove and responsibly dispose of contaminated materials such as wet drywall and insulation to prevent mold recurrence.
- Regularly monitor humidity levels and inspect for leaks to maintain a mold-free environment post-flooding.
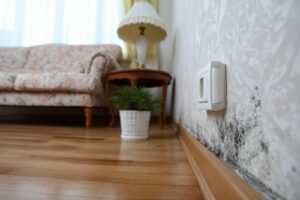
Assessing the Extent of Mold Growth
How can you effectively assess the extent of mold growth after flooding? Start by utilizing mold detection methods tailored for your environment. These methods can include moisture meters and air sampling kits, which help identify hidden mold sources.
Visual inspection techniques are essential, too—check areas that are prone to dampness, like basements, attics, and behind walls. Look for discoloration, water stains, and musty odors, which often signal mold presence.
As you conduct your assessment, take detailed notes on affected areas and moisture levels. Don’t forget to examine surfaces like carpets, drywall, and wooden structures, as mold can thrive in various materials.
Ensuring Proper Ventilation
To effectively combat mold growth after flooding, it’s vital to ensure proper ventilation in the affected areas.
Open windows and doors to promote airflow, and utilize exhaust fans to help remove damp air.
This proactive approach minimizes moisture levels, which is essential for successful mold remediation.
Open Windows and Doors
Ensuring proper ventilation is essential in the aftermath of flooding, as it greatly aids in mold remediation.
One effective way to achieve this is by opening windows and doors to facilitate fresh air and outdoor circulation. This helps reduce humidity levels and promotes the dispersal of mold spores.
When you let in fresh air, you create an environment that’s less conducive to mold growth. Make sure to keep these openings ajar for as long as possible, especially on dry, breezy days.
You’ll notice that a well-ventilated space feels lighter and more inviting, fostering a sense of comfort and belonging in your home.
Prioritizing air circulation can markedly enhance your mold remediation efforts.
Use Exhaust Fans
While opening windows and doors is beneficial, using exhaust fans can greatly enhance ventilation during mold remediation efforts.
By strategically placing exhaust fans in affected areas, you can markedly improve air circulation, which is essential for effective mold prevention. These fans help to expel humid air and introduce drier air, creating an environment less conducive to mold growth.
When operating exhaust fans, make certain they’re positioned to draw moist air out of the space. This proactive approach speeds up the drying process while minimizing the risk of mold spores spreading to unaffected areas.
Cleaning and Sanitizing Affected Areas
To effectively clean and sanitize areas affected by flooding, you’ll need specific cleaning supplies tailored for mold removal.
Understanding the various sanitization techniques is vital to ensure that you eliminate all traces of mold and prevent future growth.
In this section, we’ll outline the essential tools and methods you should employ for thorough remediation.
Essential Cleaning Supplies
When tackling mold remediation after flooding, having the right cleaning supplies on hand is crucial for effective cleanup and sanitization.
Start with safe cleaning agents like hydrogen peroxide, white vinegar, and commercial mold removers specifically designed for this purpose. You’ll also need scrub brushes, sponges, and rags to physically remove mold from surfaces.
Don’t forget to wear personal protective equipment, such as gloves and masks, to ensure your safety. Incorporating mold-prevention strategies, such as dehumidifiers and fans, can help dry out affected areas and reduce mold regrowth.
Sanitization Techniques Overview
Effective sanitization techniques are essential for cleaning and sanitizing areas affected by flooding and subsequent mold growth.
Start by removing any standing water and drying surfaces thoroughly, as moisture promotes mold development. Use a mixture of water and detergent to scrub affected areas, ensuring you reach all hidden spots where mold could thrive.
After cleaning, apply a suitable disinfectant specifically designed for mold prevention, following the manufacturer’s instructions carefully. This step considerably reduces health risks associated with mold exposure.
Be sure to ventilate the area during the process to improve air quality. Regularly inspect for any signs of mold recurrence, as proactive measures foster a healthier environment for you and your loved ones, reinforcing your commitment to safety and well-being.
Removing Contaminated Materials
Removing contaminated materials is an essential step in mold remediation after flooding. To effectively combat mold growth, you need to identify and remove any materials that can harbor mold spores, such as wet drywall, insulation, and carpeting.
Once you’ve identified these items, proceed with mold disposal in accordance with local regulations to ensure safe, responsible disposal.
After you’ve cleared the contaminated materials, it’s vital to focus on material replacement. Choose materials that are resistant to mold, like moisture-resistant drywall and treated wood, to minimize future risks.
Confirm that all replacements are installed properly to maintain a dry environment, which is key to preventing mold recurrence.
Applying Mold Inhibitors and Sealants
After you’ve replaced contaminated materials, applying mold inhibitors and sealants becomes essential for long-term prevention.
These products play a critical role in your mold prevention strategies, ensuring that your home stays safe and healthy. Here’s how you can effectively apply them:
Choose the right product: Select inhibitors and sealants specifically designed for mold resistance.
Follow instructions: Adhere to the manufacturer’s guidelines for the best results.
Prepare surfaces: Clean and dry all surfaces before application to enhance adhesion.
Apply evenly: Use a sprayer or brush for an even coat, covering all areas thoroughly.
Monitor and maintain: Regularly check for any signs of mold and reapply as necessary.
Using Dehumidifiers to Control Moisture
A dehumidifier is an indispensable tool for controlling moisture levels in your home, especially after flooding. By reducing humidity, you can create an environment that discourages mold growth and protects your living space.
For effective moisture control, consider dehumidifier placement; position it in the most affected areas, such as basements or near water-damaged sections. Confirm that the unit has adequate airflow and isn’t obstructed by furniture or walls.
Regularly empty the water tank or connect a hose for continuous drainage to maintain efficiency. It’s also crucial to monitor humidity levels with a hygrometer, aiming for a range between 30% and 60%.
This proactive approach not only safeguards your home from mold but also promotes a healthier living space. By using a dehumidifier effectively, you’re taking an important step toward restoring comfort and safety in your home after flooding.
Monitoring for Future Mold Growth
Even when you’ve successfully remediated mold after flooding, vigilance is key to preventing its return.
Implementing effective monitoring strategies will help you stay ahead of any future growth. Consider these mold detection methods for long-term prevention:
- Regularly inspect areas prone to moisture, like basements and bathrooms.
- Use humidity monitors to ensure levels stay below 60%.
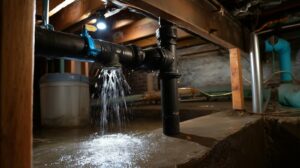
- Check for leaks in plumbing and roofs that could lead to damp conditions.
- Employ air quality tests to detect mold spores in your environment.
- Keep a log of inspections and findings, noting any changes in moisture levels.
Frequently Asked Questions
How Long Does It Take for Mold to Start Growing After Flooding?
Mold growth can start within 24 to 48 hours after flooding, depending on moisture levels and temperature. Understanding flooding effects helps you act quickly, preventing larger infestations that compromise your space and well-being.
Can I Use Bleach to Kill Mold Effectively?
You can’t rely solely on bleach for effective mold remediation. While it kills surface mold, it doesn’t penetrate porous materials, leaving mold spores behind. Consider using specialized products for a thorough and lasting solution.
Are There Specific Mold Types to Worry About After Flooding?
Yes, after flooding, you should worry about black mold and other toxic molds. Their presence can pose serious health risks, so it’s essential to identify and address them promptly to ensure your environment remains safe.
How Do I Know if Mold Is Completely Removed?
To know if mold’s completely removed, conduct mold testing and perform a thorough visual inspection. Check for any lingering signs of moisture or spores, ensuring a safe environment and peace of mind for you and your loved ones.
Should I Hire a Professional for Mold Remediation or Do It Myself?
You should definitely hire a professional for mold remediation; DIY risks can turn a small issue into a catastrophic nightmare. While costs matter, your health and safety are priceless, so choose wisely.
Recap
By embracing these effective mold remediation techniques, you’re not just tackling a pesky problem; you’re nurturing a healthier living environment. Evaluating mold growth, ensuring ventilation, and removing contaminated materials are all steps toward restoring your space. Applying mold inhibitors and using dehumidifiers helps create a proactive shield against future growth. By staying vigilant and monitoring for mold, you’re investing in the long-term well-being of your home and loved ones, turning potential hazards into a safe haven.